Monday, June 29, 2009

baby ATC


I couldn't resist the theme at the challenge blog Think Monday Think ATC which was look into a face. so I used one of the adorable babies from the ooh baby plate

doll card


I made this for the mixed media monday challenge using a stamp from the Thank heaven for little girls plate. I love using fabric and buttons on my cards.
You can also see this on my blog

Thursday, June 25, 2009

Summer is Here! Cards to Inspire You


Grab some scraps of paper, a few 12 x12 sheets of double sided paper, a handful of Estelle's The Stampsmith rubber art stamps and a rainbow of Memento Dye Ink Dew Drop Pads to create these EASY PEASY mini collage cards. Background papers are from Scenic Route.


These were so easy. I cut a piece of 3.5" x 2.5" Neenah cream colored cardstock and incorporated images from the following The Stampsmith rubber art plates:

Floral Alphabet

Medieval Ornaments #2


Begin your stamping layers starting with the lightest Memento dye ink colors first. Finish with the darkest Memento dye ink color on top.

I used a Tsukineko long oval dauber to edge all four sides with a coordinating color of Memento dye ink before mounting it on my cardstock.

I hope the following cards inspire you to create some mini art collage pieces of your own. Better yet...have a few friends over for a stamping party...serve cupcakes and ice tea and stamp your little hearts out. Then have a card exchange!!!

Creatively yours,
Maria ;-)

Tuesday, June 23, 2009

Sand and Pebbles...Great Wall of China...

I have been creating "sand and pebble" backgrounds in a variety of colors all day! I hope you enjoy the cards I made using The Great Wall of China Rubber Art Plate from The Stampsmith.

As the New Design Team Member for Stamper's Quest, I will be highlighting The Stampsmith in my July 27th article.

There will also be a video series I will post on how to create these "Sand and Pebble" backgrounds so mark your calenders for July 27th! ;-)

Enjoy your day!
Maria

Monday, June 22, 2009

Great Wall of China Images

Today I played with my dye ink re-inkers on glossy cardstock to produce background papers that I embossed with clear embossing powder. I then stamped images from The Stampsmith's Great Wall of China plate onto the embossed backgrounds with Black Staz-On. I put on some finishing touches, edged with a metallic gold Sharpie marker and added some "Stickles" accents for shine. Stay tuned for my next video tutorial in the next few days. I'll show you how easy it is to create these background papers.

Creatively yours, Maria ;-)

Sunday, June 21, 2009

pet twinchie


I made this for the theme at small world of inchies and twinchies. You can also see it on my blog.

Saturday, June 20, 2009

3 versions of same image


I wanted to show the different feel you can achieve with the same image when you use alternate colouring and mounting options. I used an image from the Marilyn 2 plate for these. One only has the lips coloured, the others are more fully coloured using waterbased markers applied by paintbrush and chalks. More details on these cards can be found on my blog here.

Wednesday, June 17, 2009

serene tag


I made this simple and serene tag for a couple of challenges, using this lovely girl off the "isn't she lovely" plate.
You can also see it on my blog

Monday, June 15, 2009

Friends cards


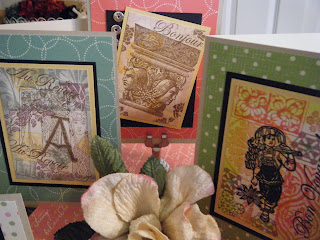
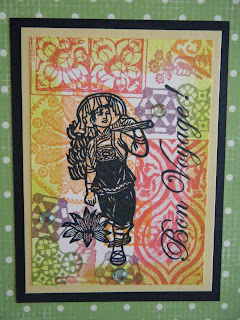
The main image for this card is sold as a single called Girlfriends. It comes in this size and a smaller version. It is stamped on glossy cardstock with Memories black and coloured with waterbased markers used as paint and chalks. The words are made with a dymo label maker and the embossed lines on the bottom of the card were done using a Scor-it.


This image is from the Those were the Days plate. It is also stamped in Memories black on glossy cardstock, and coloured with markers and chalks. The friends label was done using green vellum in a dymo label maker.

More details can be found on my blog.


Lucy birthday card


This card used an image from the Lucy plate. She is stamped with Memories black on glossy cardstock and coloured with both watercolour makers applied with a paint brush and chalks. The lettering was done using green vellum in a dymo label maker.

Sunday, June 14, 2009

more Dorothy from me


I caouldn't believe when the them at sunday postcard art was somewhere over the rainbow, so I made this postcard (6"x4")
There are more details on my blog

Saturday, June 13, 2009

Dorothy Twinchie


I made this twinchie for the small world of inchies and twinchies challenge, where the theme is black and white with a touch of red. I felt that the wizard of oz theme was perfect for this, so I used just stamps from the stampsmith wizard of oz plate. there is more information on my blog

Friday, June 12, 2009

Cards from Pat Huntoon

Good afternoon,

Pat sent me an email with some beautiful cards to share with you all. 


image001

image002

image003

Thank you so much for sharing your lovely art with us Pat!  And remember, if you have some cards you would like to share, please email them to Kim at kimmyprince@gmail.com

Have a wonderful day!
:)
Kim

Wednesday, June 10, 2009

gift box


The theme at wednesday stamper this week was fashion, so I decided to use one of my new stampsmith stamps to decorate a gift box in the style of a miniature hat box. The image is from the "isn't she lovely" plate, and I decided to use her as I thought it remarkable how corsages and pearls are all back in fashion again.
You can also see this on my blog

Tuesday, June 09, 2009

quick good luck card


Shortly after I made that last post, my DT Package arrived from Estelle, crammed full of delicious stamps, but I fell in love with this little fella! I needed to make some good luck cards for some maths students I am tutoring and the expression on this guy's face just said it all!!

collaborative project


These 2 inch squares are part of a collaborative project on my forum. Each member taking part chooses a colour scheme and everone else makes them 3 squares. This is the 4th round and the colours chosen are cream and brown. I have used the girlfriends stamp from The Stampsmith.
You can also see this on my blog

Saturday, June 06, 2009

Dare to be Fabulous Darling

 The main image is stamped with Ancient Page Chocolate Brown on glossy c/s, then coloured in using a water colouring brush and tombow markers.  I then used Tim Holtz Distress inks to make it look older.  The  flourish and sentiment are  stamped with Versafine Sepia ink.  The crochet flower is from April, who is making them for me!  They are just adorable, thank you April!  Pearls are from Kaiser Craft.  I just adore these Stampsmith photo stamps! 

OLYMPUS DIGITAL CAMERA

Thank you for stopping by tonight.  I hope you are all having a beautiful weekend!

:)  Kim